Our second boat, Denovo, had a plastic 40-gallon holding tank that was more than sufficient for our family of three for up to a week of cruising. Rendezvous was listed as having a 35-gallon tank, which turned out to be actually around 18 gallons, which is really small for a 42’ boat.
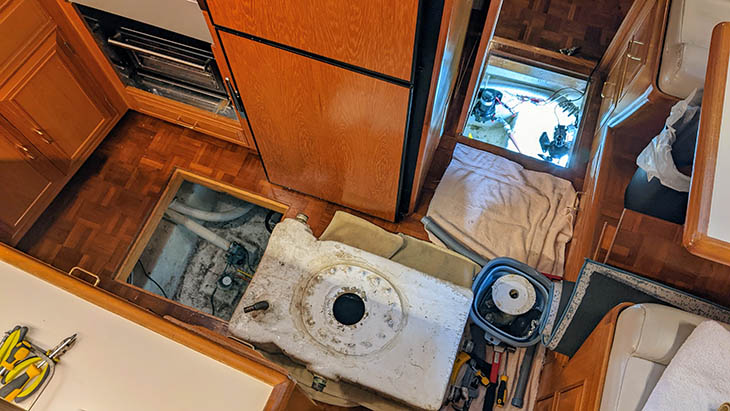
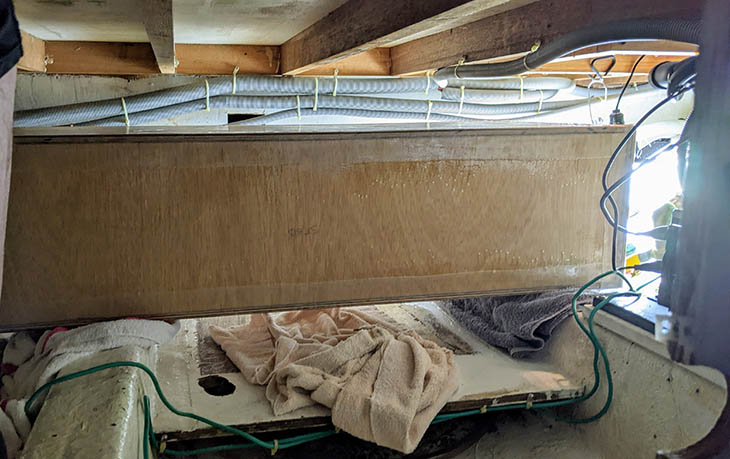
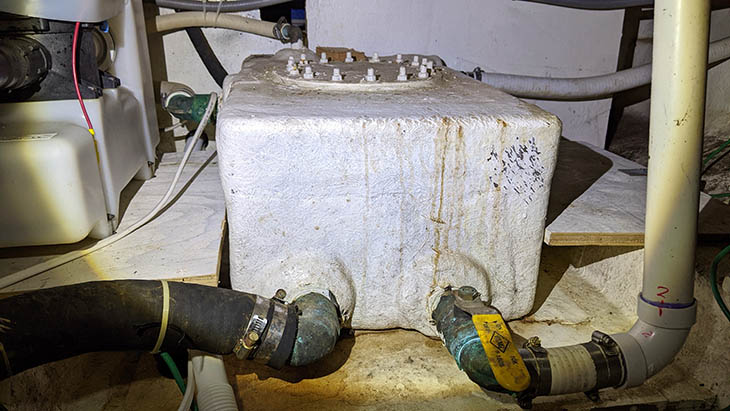 This is what we started with. A small tank, long hose runs, loose wires, and generally filthy bilge.
Unfortunately, any replacement would need to go through one of two small floor hatches, severely limiting off-the-shelf options. As a stopgap solution, I decided to install a Dometic DTM04 tank monitor so we could get a better idea how many days that little tank would last before pumpout was necessary while I considered options for replacing the tank.
That plan changed quickly when I drilled the pilot hole through the inspection cover and was greeted with escaping pressurized air followed by oozing grossness. It turned out the vent fitting on the tank, the vent hose, and the vent thru-hull were all significantly clogged. Moreover, the tank had some kind of rubber lining that would make sealing the tank monitor impossible.
So we cleared the vent line and attached it to a new temporary fitting on the tank, but replacing the tank was now at the top of our project list.
Plastic Tanks
It’s common for newer boats to have plastic tanks with spin-weld fittings. Ronco Plastics has dozens of standard sizes and will also make custom tanks on request. Their tanks are reasonably priced and a great option, so I set about trying to plan an installation that would give us the greatest capacity.
It was pretty quickly apparent that the largest plastic tank that could fit through the floor hatches was no bigger than the tank we wanted to replace. So I drew up a few designs for connecting several tanks together.
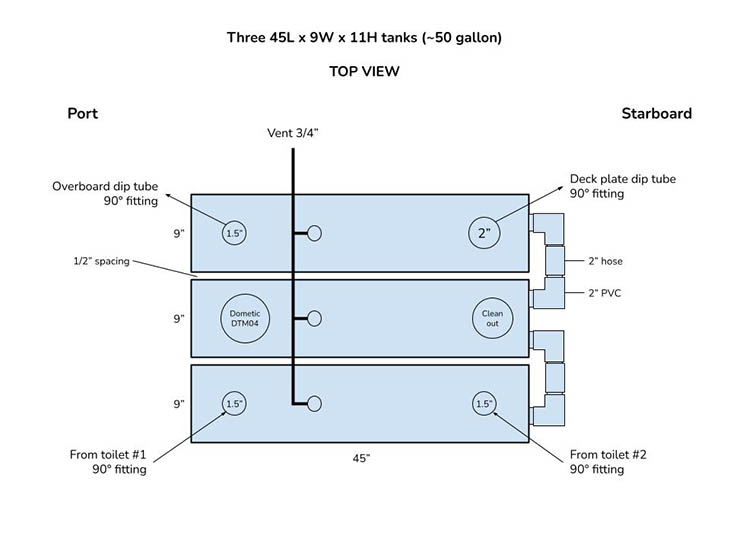 This is one iteration of my multi-tank design.
I knew that connecting mulitiple tanks is generally frowned upon, and it certainly wasn’t my first choice, but desperate times call for desperate measures. Concerns are usually non-specific, but include draining and venting issues. I knew each tank would need to be individually vented, and I figured they’d drain okay as long as they were on the same level. I accepted the fact that they wouldn’t aerate very well with a shared vent line, and that finding large fittings and hose for the tank connections could be challenging.
I sent an early design to Marine Sanitation and Supply (a Ronco retailer), and they responded with a short, but affirming message. So I figured this wasn’t an entirely stupid idea.
However, my hopes were dashed later when I got close to placing an order, and someone from their holding tank department called to say they couldn’t recommend I connect multiple tanks (but they’d happily take my order). Instead of charging ahead, I hit the pause button and went back to researching options.
Custom Tank
One of the first things I found was this article on BoatNotes.com about building custom tanks from plywood and fiberglass. I had never used fiberglass before, but am pretty handy and wanted to get some experience with it. And the video series made it look pretty simple. The one obvious difference being that I couldn’t complete the tank in my garage; I’d need to assemble it in the bilge.
I bought a sheet of 1/2” marine plywood for the top and bottom, and 3/4” for the sides. This would give me more wood to screw into when assembling the tank, as well as provide more strength where it was needed. I ordered some West System 105 resin and 206 slow hardener because I figured I’d need the extra working time while learning and while assembling in the bilge. Then I made a miniature prototype box to practice on and work out any obvious kinks. To my surprise, the process of glassing the panels was pretty straightforward, and potting with thickened epoxy to make threaded inserts worked really well.
 My mini practice box gave me confidence this would work.
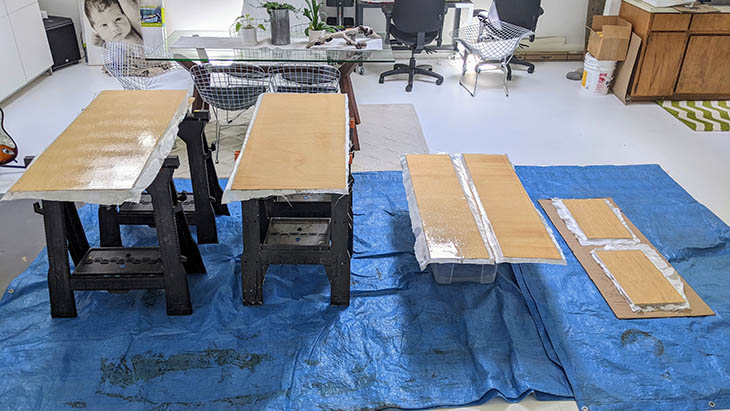
With a solid plan in place, I started making the panels for the full-size tank. Everything seemed to be going swimmingly; I put down a saturation coat and let it cure so the cloth would be easier to smooth out. After sanding and wetting out the cloth, I finished with two more epoxy layers while the previous layer was still tacky.
Oops
After all panels had cured for a day, I started making holes for fittings in the top. I immediately noticed that some of the cloth was separating from the plywood as my drill bit pushed through. Obviously the epoxy wasn’t cured completely and didn’t really seem like it was going to. At first, I thought it was because the garage temperature ranged from 45-60F, and the minimum recommended temperature for the 206 hardener is 60F. But after thinking about it more, I decided I had probably just not done a good enough job mixing the resin and hardener.
Completely mixing the resin and hardener is critical and requires 2-3 minutes of slow, continuous mixing. You can’t be too aggressive or you’ll introduce a lot of bubbles. As soon as you start mixing, the resin and hardener will take on a swirly look. You must keep mixing until it becomes completely clear again!
Course Correction #1
Most of the panels seemed to be okay and had cured correctly. I made a brief attempt to pull the cloth off the top panel, but it was a sticky disaster. Since it’s likely I didn’t mix the resin consistently, I decided to sort of start over by just flipping the good panels so the suspect inside would become the outside, and then cut a new piece of plywood for the top. This had the added benefit of providing moisture protection and strength to the tank exterior and peace of mind knowing the critical interior surface was cured correctly.
I also decided to wet out the panels in the garage, but then immediately move them inside for additional coats and final curing. The end result was panels that looked and felt right, and I had confidence moving forward.
 Finishing the panels inside for better temperature consistency.
Course Correction #2
I had originally planned to position the tank perpendicular to the centerline, sitting on the stringers. This would make some of the fittings very easy to access from the galley hatch, and also preserve a space to work between the tank and forward bulkhead. However, a last minute check of hoses revealed that the higher position would cause low spots in the intake hoses and accelerate permeation of the hoses.
So I decided to maintain the position of the original tank and extend the shelf it sat on to accommodate the longer tank. This also made me feel less bad about screwing up the original top panel because I now had a blank slate to lay out the holes differently.
Removing the Old Tank
At this point, we were pretty committed to the new tank and needed to get the old one out for final measurements and fitting placement. This part of the process went almost exactly as I had expected. It was a dirty, sweaty, gross job that started with a thorough pumpout and flushing, followed by removal of all fittings, catching as much of the contents into buckets as possible. What I thought was adhesive holding the tank onto the shelf was actually fiberglass, which I broke free with a prybar and cut off with a coping saw.
 After we wrestled the beast from the bilge.
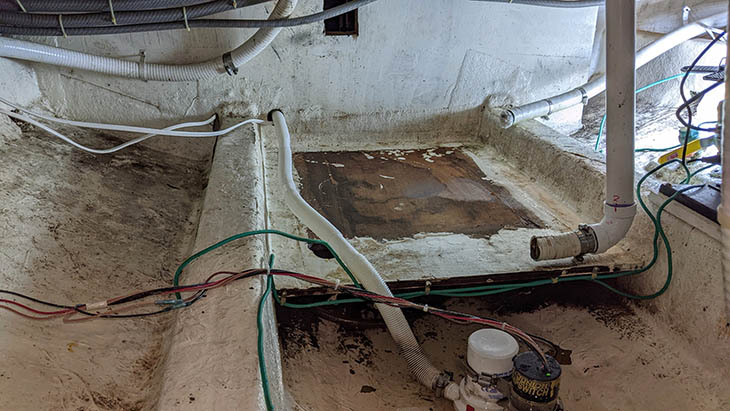 What remained after removing the old tank.
With the tank out, my wife spent two days cleaning years of accumulated dirt and grime from that entire area of the bilge. I was very thankful for this because I knew I’d be crawling around down there a lot during the installation. Cleaning helped a little with the bilge smell, but there were still permeated hoses delivering their “fragrance”. Over the next several boat visits, we eventually removed almost all of that old plumbing.
Fittings
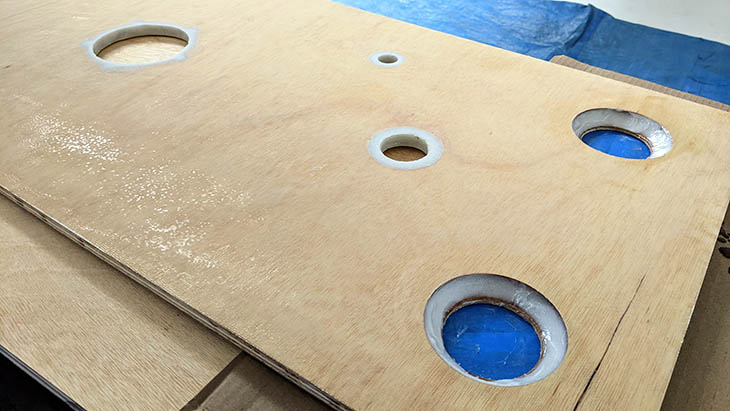
With the old tank out, I made a final decision on fitting placement. I needed several types of holes in the top panel:
- Two 3/4” NPT for vent line fittings
- Two 1.5” NPT for intake from the two toilets
- Two 2.5” holes for the 1.5” diptube uniseals
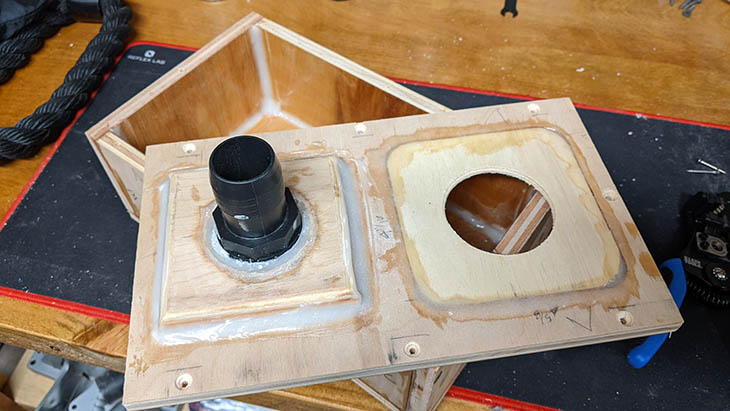
- One 4” hole for the Dometic flange kit
My prototype confirmed that making the threaded holes with thickened epoxy was pretty easy, so I didn’t have any concerns there.
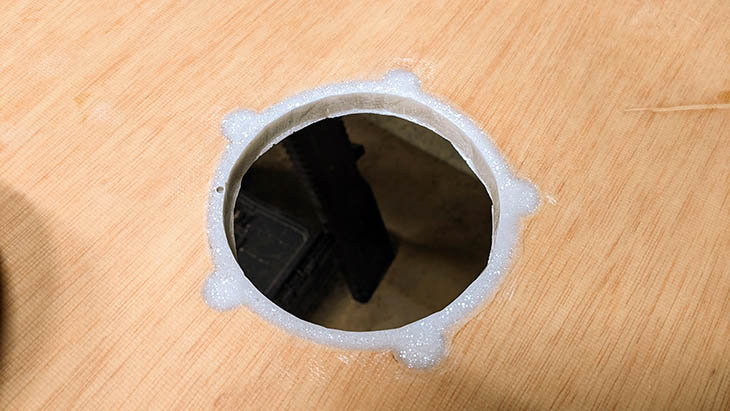
The uniseal holes presented a challenge because they recommend a maximum 3/8” material thickness so the rubber can be pushed outward forming a tight seal. My plywood was 1/2” thick plus a little for the fiberglass, so I ended up making a 3.5” hole covered with 1/4” plywood for the uniseal to mount to. I expected pushing the PVC pipe through the uniseal would require a little muscle and didn’t want to risk cracking the 1/4” plywood, so I reinforced the underside with an epoxy fillet.
 Reinforcing the underside of the uniseal holes.
The Dometic flange needed a large hole along with 5 small holes for the thru-bolts. To avoid problems with the plywood rotting, I made a 4.5” hole with 3/4” overlapping holes where the bolts would go, and then potted the whole thing with epoxy.
 Potted hole for Dometic flange kit.
I then sanded the excess epoxy flush and both sides of the entire panels in preparation for assembly on the boat. Sanding revealed some pits and small pockets of filler, which I’m not sure how to avoid. But it didn’t seem to affect the strength, and the final epoxy coat during assembly would at least fill the exposed pits.
Before moving the operation to the boat, I drilled holes for the flange bolts and adjusted the tank monitor sensors for the internal height of the tank.
 Dometic tank monitor sensor adjustment.
Finally, I made the diptubes from 1.5” PVC pipe. I chose a length that would allow the PVC elbow to sit on the uniseal with the diptube about 1/4” from the bottom of the tank. I cut the diptube bottoms at an angle to copy the off-the-shelf version, and made sure to sand all edges smooth to prevent anything from snagging.
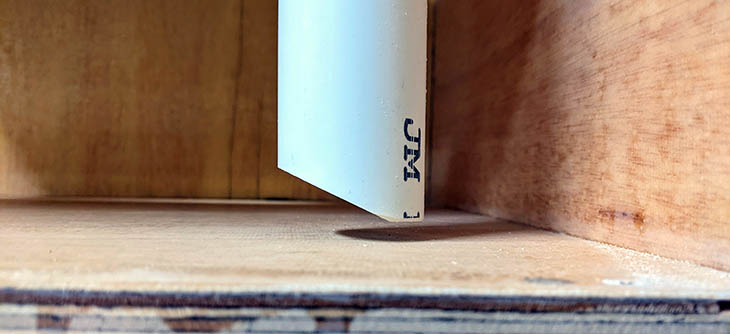 Confirming the length of the diptubes before sanding edges.
Assembly
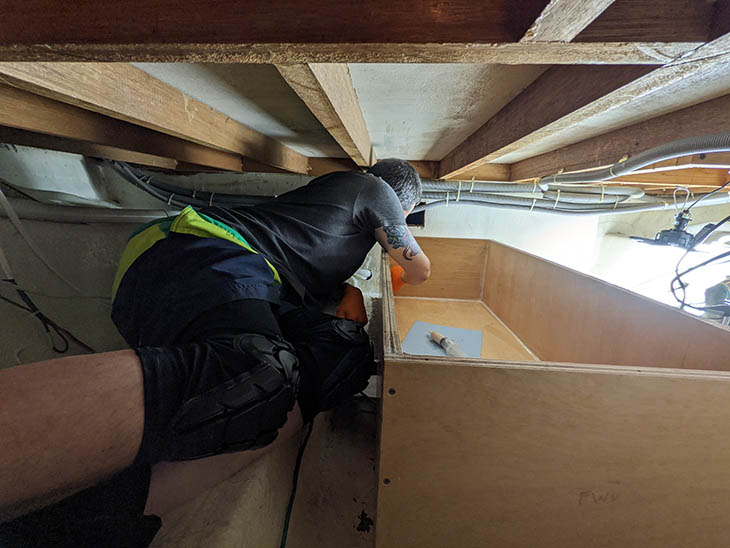
Now that the panels were ready and we had visualized how the assembly would proceed knowing we’d be against the epoxy clock, we set up shop at the boat. I got down into the bilge while my wife handed me tools and mixed epoxy above. Without too much drama, we were able to get the box assembled and added fillets to the inside corners. It was a huge relief to get this done without having epoxy start to harden too soon and/or accidentally drop a panel and end up with epoxy all over everything.
 Adding interior fillets before the epoxy in the joints set up.
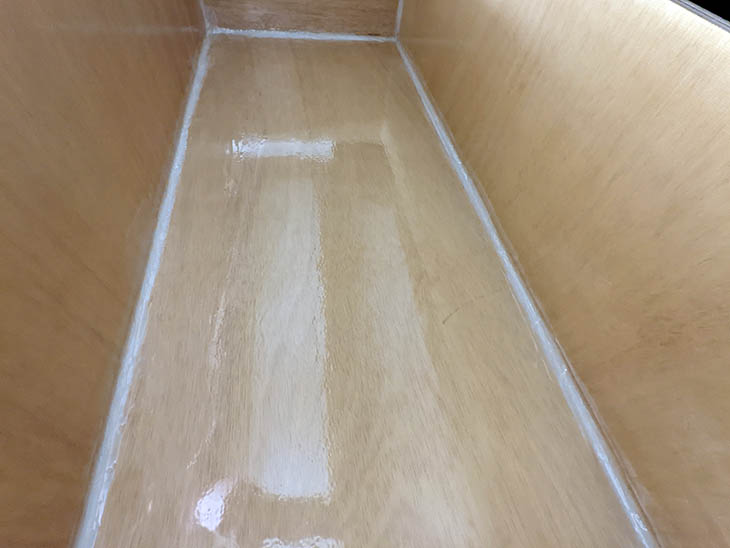
After the fillets had hardened for an hour or so, I rolled a final coat of epoxy on the entire interior surface.
 Final interior coat of epoxy over fillets.
The rest of the assembly went fairly smoothly, basically copying what was done in the BoatNotes.com video. We bonded and screwed the top on, and followed that up with 4” fiberglass cloth tape wrapped on all exterior edges. Once that was cured, we moved the tank up onto the stringers to make room to extend the shelf.
 Tank moved out of the way while working on shelf.
I used cardboard to get rough measurements for the shelf, knowing the stringers are slightly tapered. Then we moved the tank back into place and coated it in a durable 2-part epoxy primer. Again, just copying the video here.
 Painting the tank adds even more protection, but is mainly just for cosmetics.
At home, I cut a piece of 3/4” plywood for the shelf slightly larger than I needed. I screwed on a piece of scrap that would help align things when test fitting and brace it while curing. After some minor trimming with a circular saw, we glassed it to the stringers with polyester resin and glass mat, just as the original shelf was done.
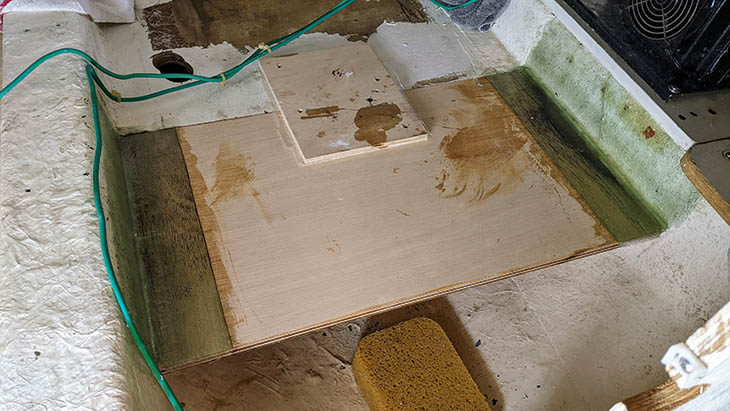 15-inch shelf extension installed.
Once cured, I used up some old marine paint I had from a previous job and threw a quick coat on the entire shelf.
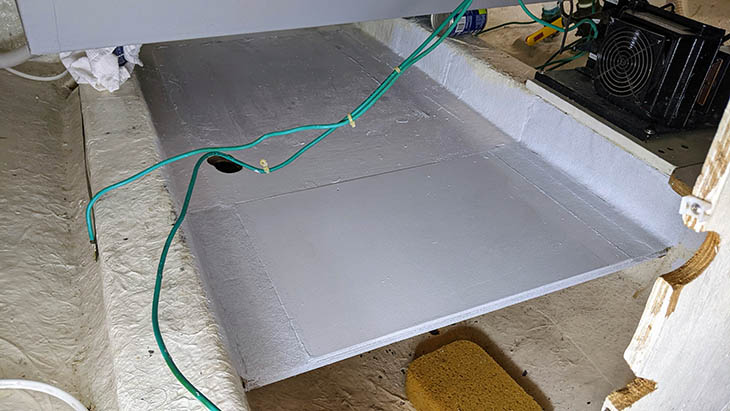 Shelf extension painted.
Installation
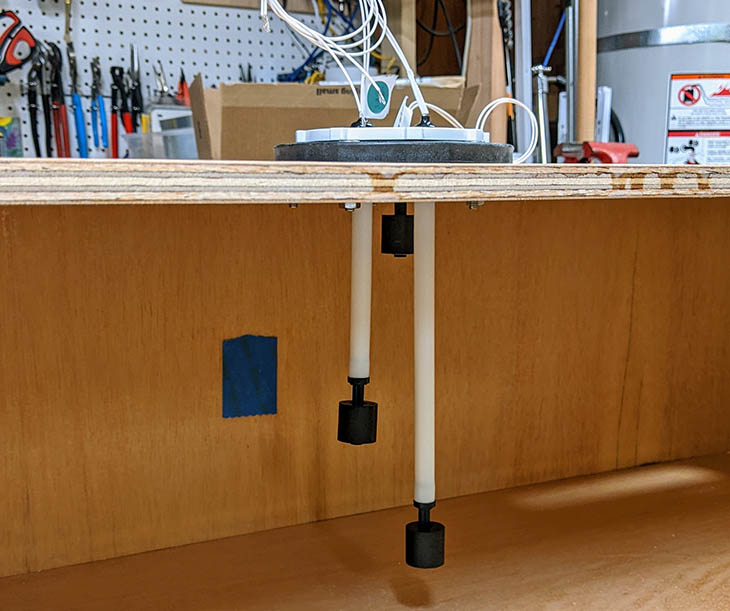
With the tank complete, shelf extended, and new 1.5” hoses run to each head, it was time for the final installation. Originally, I planned to epoxy four blocks onto the bottom sides of the tank and then secure the tank to the shelf with stainless L-brackets. However, I decided to “float” the tank instead to reduce the chance of vibration causing problems with fittings cracking and whatnot. So I set the tank on dense rubber mats, installed furniture levelers to prevent side-to-side movement, and used stainless cable with turnbuckles to prevent the tank from going airborne in rough seas. This was some serious gold-plating, but I could justify it because I saved money by doing this project myself.
Once the tank was secured in place, we glued up the PVC fittings, including the Dometic hose adapters. Unless you’re a masochist, these are preferred over barbed fittings because of the larger sealing surface and ability to remove them for service later if necessary. Because the overboard plumbing between the tank and pump has no way to empty completely, we used PVC pipe there to avoid issues with permeation. But we connected it at each end with a short section of hose to allow it to flex.
 We used hard PVC pipe for most of the overboard discharge plumbing.
I was concerned the diptubes would be difficult to force through the uniseals, and I’m glad I reinforced that area with epoxy fillets. With a little dish soap and elbow grease, though, that part was pretty uneventful. Our boat has an unusual 2” pumpout fitting, which was connected to a seriously heavy duty wire-reinforced fuel line. Instead of trying to find 2” fittings for the tank, I cut most of the 2” hose out and connected it to new 1.5” hose with a reducer. If I ever have problems with this, I’ll replace the deck fitting and run new continuous 1.5” hose. We managed to get everything put together enough to make a last-minute 3-hour run up to Poulsbo before dark to meet friends.
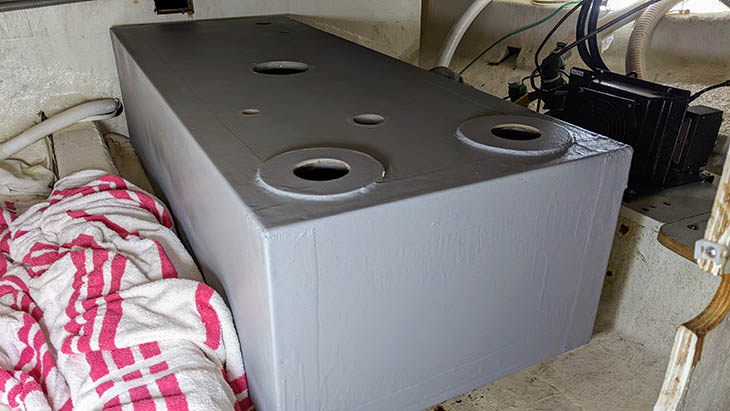
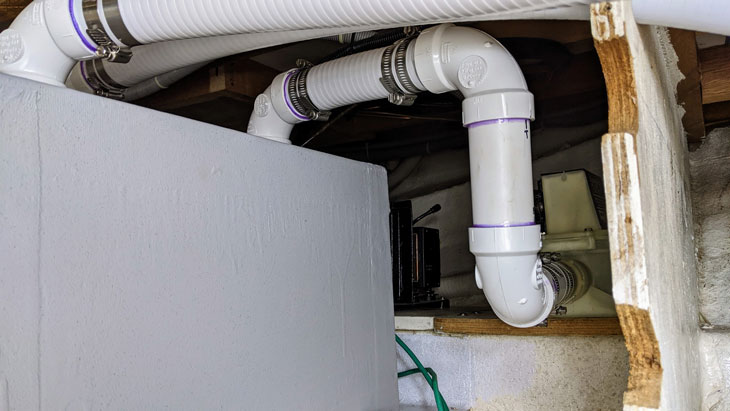
 The finished tank looking through the forward galley hatch.
When I woke up the next day on the dock at Poulsbo, my morning project (after coffee!) was to wire up the tank monitor with waterproof connectors at each end. A future project is to replace the instrument panels above the lower helm, but for now I made use of a random black plastic cover over a hole next to the bridge comms (aka cocktail ordering device). The hole it was covering turned out to be the perfect size for the monitor display and conveniently located close to a fused terminal block. Finally, something was easy!
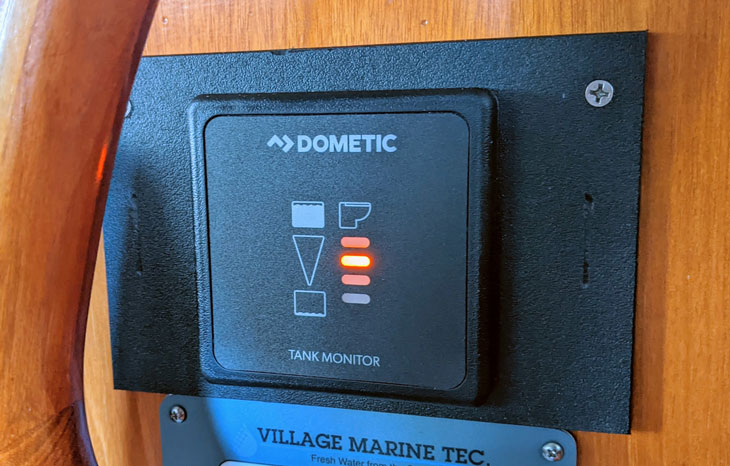 The Dometic DTM04 display temporarily located at the lower helm.
Final Thoughts
This was definitely the hardest boat project I’ve done so far. While nothing was technically difficult, climbing in and out of the bilge for what felt like a million times left my 50+ year-old body feeling continuously sore for the better part of a month. However, it was also a great way to get experience working with fiberglass on a relatively low-tech, non-cosmetic, but very critical project. I could easily have put it off for years, but it’s super rewarding now that it’s done. And the extra capacity will be much appreciated during our Desolation Sound trip this summer.
Would I do it again? If I was starting the project today, I’d definitely consider adding a second, identical hatch next to the existing one in the middle of the galley floor. This would be similar to how multiple salon engine hatches and supports can be removed to open a large hole. I have a lot more experience working with wood and am pretty sure I could add another galley hatch without too much difficulty, which would make it pretty easy to drop in a plastic tank. If we ever have to remove the tank (knocking on wood that never becomes necessary), I think I’ll start by adding a hatch.